Guidewire PolicyCenter Online Training Course
Guidewire Policy Center Introduction
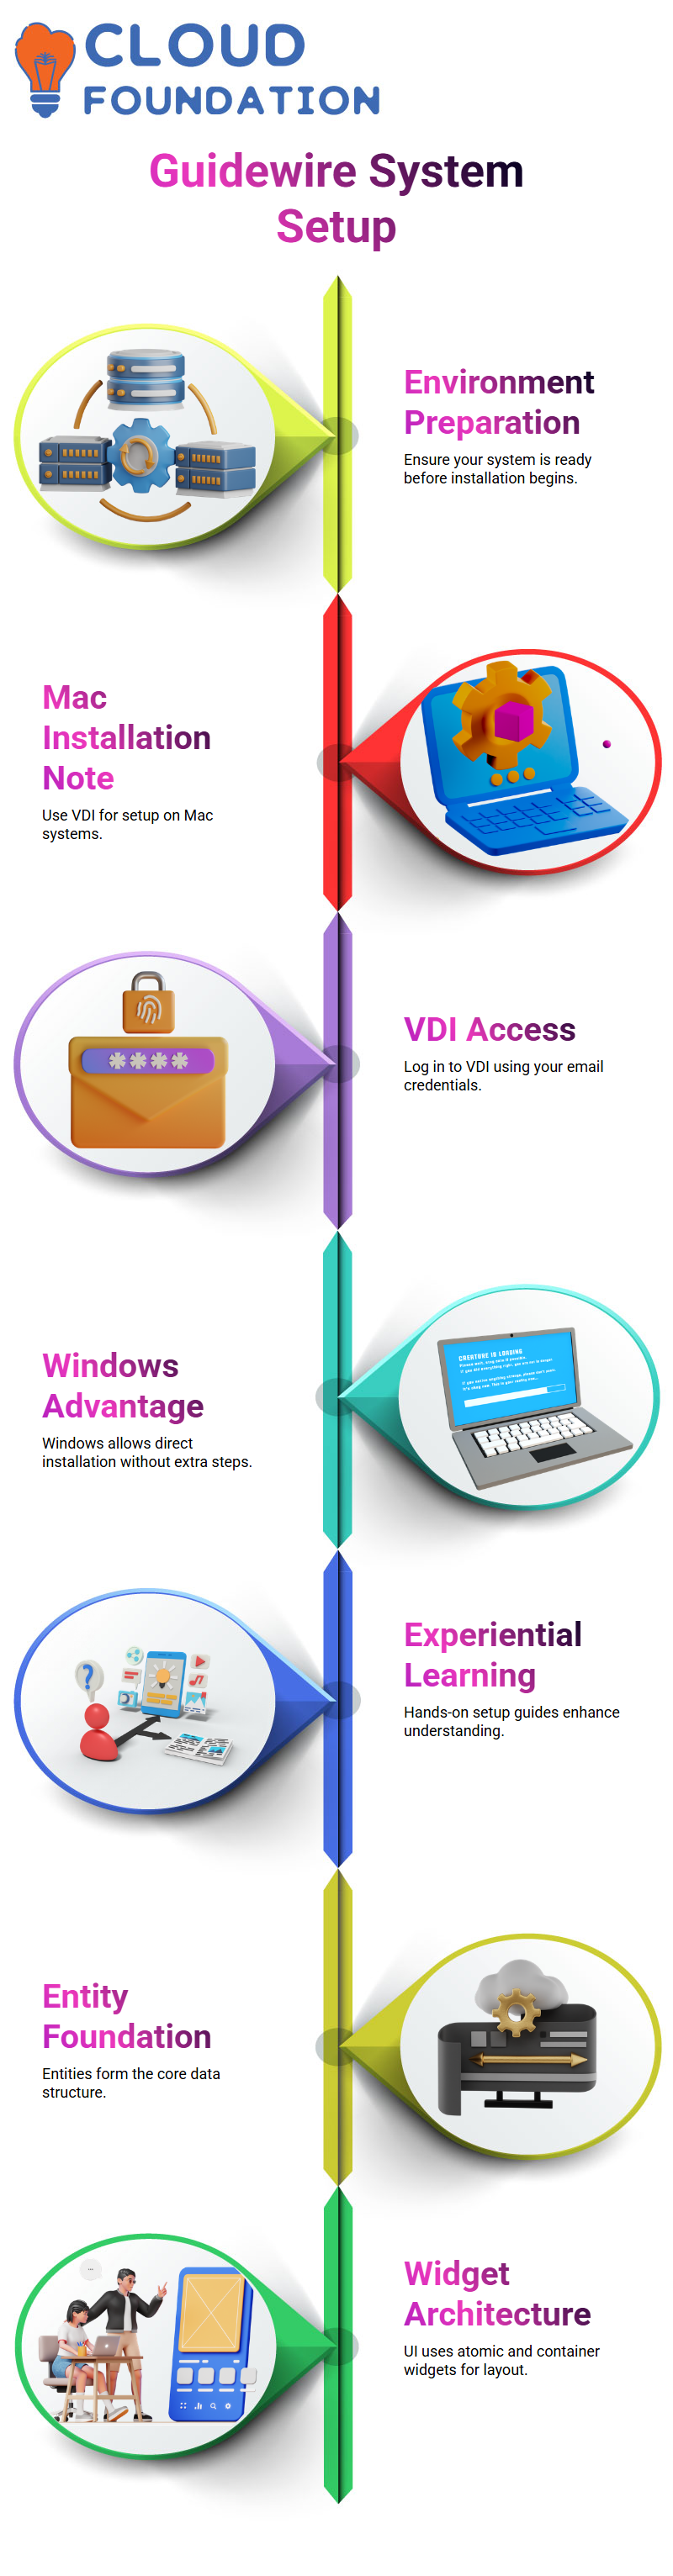
The Guidewire Policy Center welcomes you. I want to take you through the process of setting up your local system today.
Setting up your environment correctly is essential before exploring the features so you can follow along without any problems.
We start by making sure your local computer is prepared. Be aware that straight installation may not be possible if you’re using a Mac.
We make use of a virtual desktop environment (VDI) in these situations.
To download the required components, you must first check in to the VDI using your email address.
The setup is made simpler if you have a Windows machine since everything may be installed immediately.
The Guidewire Policy Center places a strong emphasis on experiential learning. For this reason, I walk you through the setup process step-by-step.
Guidewire Policy Center Entity Setup
Entities serve as the foundation of the data structure in the Guidewire Policy Center.
After entities are set up, we concentrate on utilizing PCFs (Page Configuration Files) to show fields.
Guidewire Policy Center UI Architecture
We then examine the Guidewire Policy Center’s user interface architecture.
Atomic and container widgets are the two primary categories of widgets seen in the user interface.
The smallest components are called atomic widgets, and they include cells, buttons, and input fields.
For instance, a user’s name, birthdate, and age are recorded in an input field.
Actions like adding, removing, updating, and canceling are handled using buttons.
Depending on what you do, cells automatically fill in.
Atomic widgets are grouped into logical structures by container widgets.
Screen, card, list detail panel, list view, detail view, and input set are the six kinds.
Cards and list detail panels are secondary containers, while screens are top-level containers.
This category aids in the Guidewire Policy Center’s effective data and functionality organization.
Guidewire Policy Center Introduction
The foundation of your displays are the main container widgets in the Guidewire Policy Center.
The input set, list view, and detail view are our three core container widgets.
To effectively design the user interface, it is essential to comprehend them.
It is crucial to understand why these widgets are grouped in this manner.
We can properly position PCFs within the top-level container widget, maintaining a tidy hierarchy.
Guidewire Policy Center Setup and Installation
The top-level container widget in the Guidewire Policy Center is a screen.
List panels, detail panels, and cards are examples of supplementary container widgets that may be positioned inside of it.
You may then put your major container widgets, including detail view, list view, and input sets, within these secondary containers.
A main container widget may sometimes be placed within a secondary container first, followed by the secondary inside the screen, depending on the needs.
Because of its adaptability, the Guidewire Policy Center is a very effective tool for UI organization.
Guidewire Policy Center PCF Explanation
‘What is a PCF?’ you may wonder. Page Configuration File is referred to as PCF in the Guidewire Policy Center.
The layout and logic of your main container widgets are specified in this file. This is what controls the user interface’s behavior on a screen.
Your design in the Guidewire Policy Center will be reusable if you use PCFs effectively.
You can save time and maintain consistency by using a PCF for a primary container widget across many screens once you’ve created it.

Guidewire Training
Guidewire Policy Center Detail View
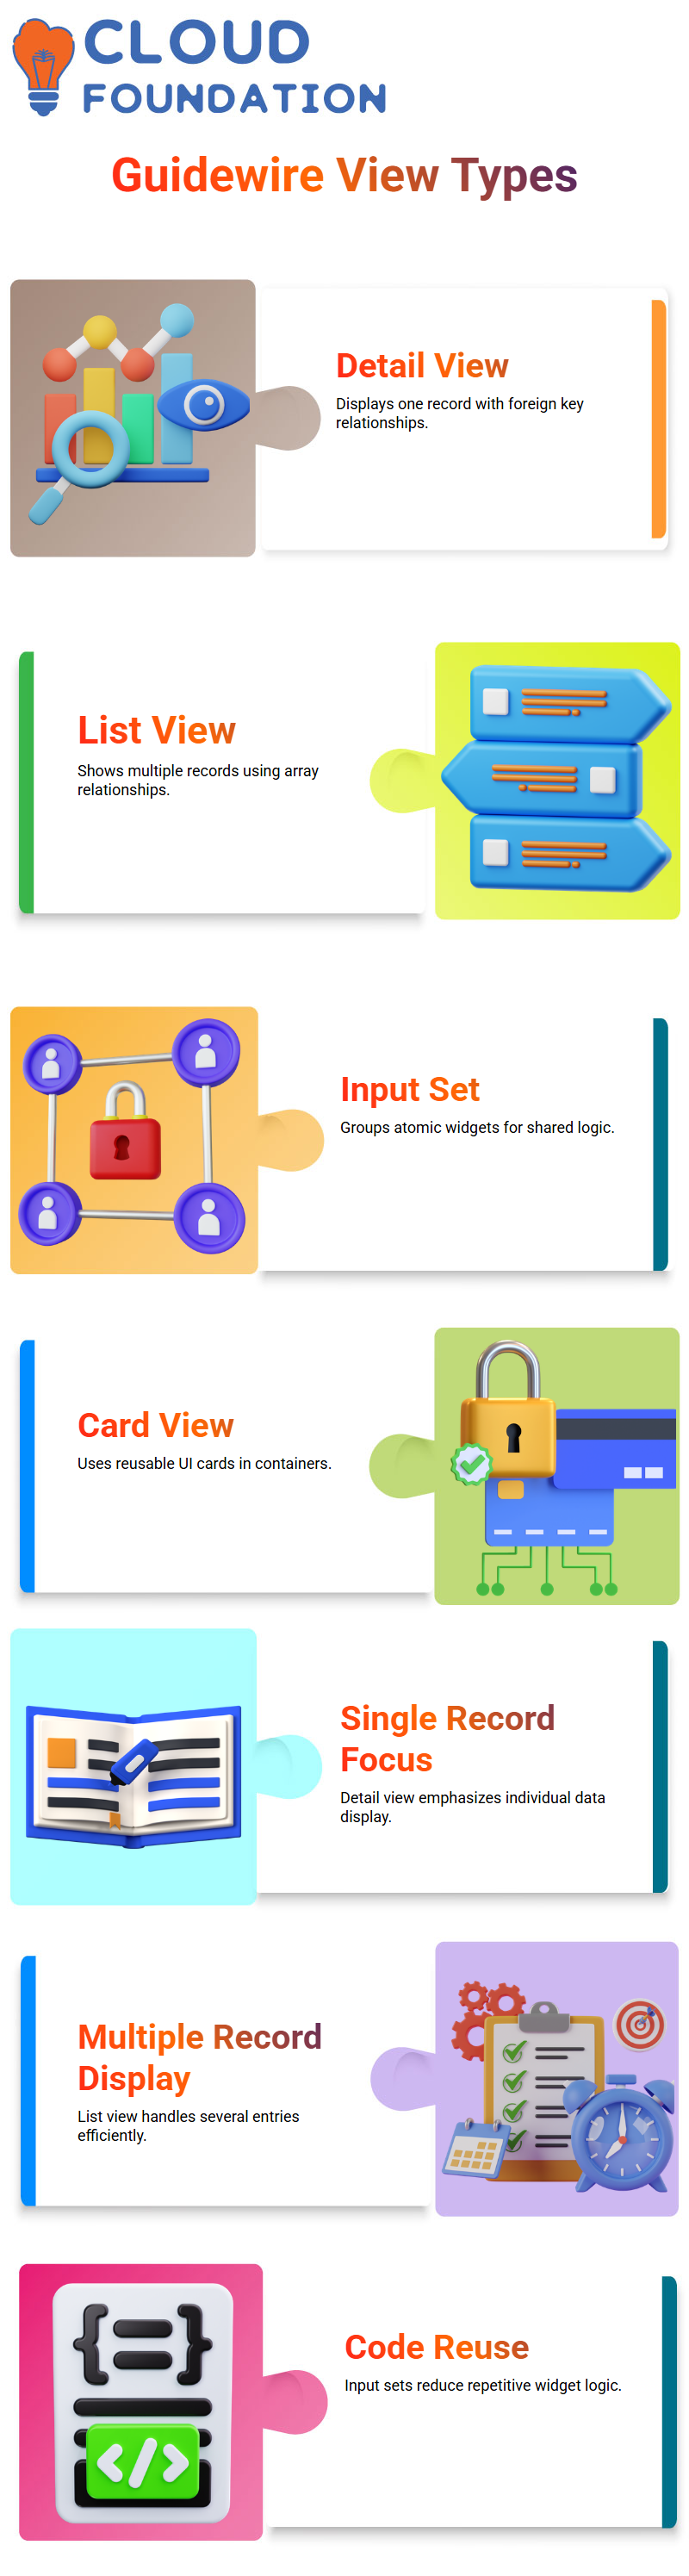
First, let’s look at the detail view. The detail view in the Guidewire Policy Center shows one record at a time.
It’s perfect for displaying personal information, such as a bank account or a person’s data.
Foreign key relationships are necessary for the detail view to get and provide the appropriate record.
Keep in mind that, in contrast to a list view, it only displays one record at a time.
Guidewire Policy Center List View
The list view comes next. The Guidewire Policy Center’s list view is designed to show many records at once.
It manages several entries well by using array relationships.
The list view allows you to see many records at once, while the detail view concentrates on only one.
When creating screens for the Guidewire Policy Center, this difference is essential.
Guidewire Policy Center Input Set
Several atomic widgets are grouped together in the Guidewire Policy Center’s input set.
For instance, you may bundle many tax fields into an input set and apply a single visibility constraint to the whole set.
This method avoids writing the same code for every atomic widget.
You specify the logic once in the input set rather than writing it five times. This facilitates Guidewire Policy Center maintenance and saves time.
Guidewire Policy Center Card View
In the Guidewire Policy Center, the card view is simple. Each card represents a small, reusable UI component, like ‘Basics,’ ‘Social Media,’ or ‘Analysis.’
Usually, cards are used inside secondary container widgets, such as list-detail panels. This enables you to cleanly show many information cards on a single screen.
Guidewire Policy Center List-Detail Panel
A list view sits above the list-detail panel, while a detail view is underneath it.
One of the Guidewire Policy Center’s most useful features is this secondary container widget.
It makes navigating complicated data simpler by enabling you to browse many entries in the list and pick one to reveal its complete information below.
Guidewire Policy Center Screen Hierarchy
The top-level container in the Guidewire Policy Center is the screen. It efficiently arranges main and secondary container widgets.
Keep in mind that atomic widgets must live in main container widgets; they cannot be directly shown on screens.
Your Guidewire Policy Center user interface will be scalable, reusable, and structured for any future modifications thanks to its hierarchical framework.
Understanding UI Hierarchy
It is quite difficult to develop the user interface if this structure is not understood.
At the Guidewire Policy Center, I provide a very basic explanation of this structure.
For instance, it’s critical to understand the roles of detail views, list views, and atomic widgets.
This is not only theoretical; you will be questioned about these positions during interviews as well.

Guidewire Online Training
Guidewire Policy Center Placing Widgets Correctly
Is it possible to have a list view within a detail view at the Guidewire Policy Center? Indeed. Is it possible to have a detail view within a list view?
No. Comprehending these positions is crucial for both practical employment and certification.
We also talk about input sets. Is it possible to insert an input set straight into a card?
No. When you practice with the development environment at the Guidewire Policy Center, you’ll rapidly discover this.
Observing Arrow Marks in Guidewire Policy Center
Taking note of the hierarchy’s arrow marks is one tactic I teach at the Guidewire Policy Center. You may put that widget if there is a direct arrow mark.
For instance, if the arrow goes in that direction, you may position the list view within the detail view, but not the other way around.
Only input sets, detail views, or list views may include atomic widgets. To help students absorb it, I show this many times at the Guidewire Policy Center.
Handling Errors During Development
The mistakes serve as useful markers. A green light indicates that a widget may be positioned appropriately.
Placement mistakes are indicated by a red light. This method makes learning very participatory and applicable.
The system reroutes an input set to the relevant detail view even if you attempt to insert it immediately within the screen.
I help students at the Guidewire Policy Center understand this reasoning, which is crucial.
Guidewire Policy Center: Starting the Debug Server
You must choose the debug server option when you initially launch the Guidewire Policy Center server.
This debug option is located just next to the server menu. It is essential to the efficient operation of the Guidewire Policy Center.
It will take a while to start the debug server in Guidewire Policy Center; typically, the first run takes two to three hours.
This is due to the fact that the Guidewire Policy Center must create a number of files before it can function properly.
Keep it running and exercise patience. You will have no trouble interacting with the Guidewire Policy Center once the server is available.
Preparing Java JDK in Guidewire Policy Center
Make sure you have the right Java JDK installed when the Guidewire Policy Center server is initializing.
Selecting the appropriate Java version is crucial for Guidewire Policy Center in order to prevent incompatibilities.
For the Guidewire Policy Center to function properly, Java setup is an essential step.
Tips for First-Time Users
Don’t worry about the lengthy initial setup if this is your first time utilizing the Guidewire Policy Center.
Allow the debug server to operate fully while the Guidewire Policy Center creates the required configuration files.
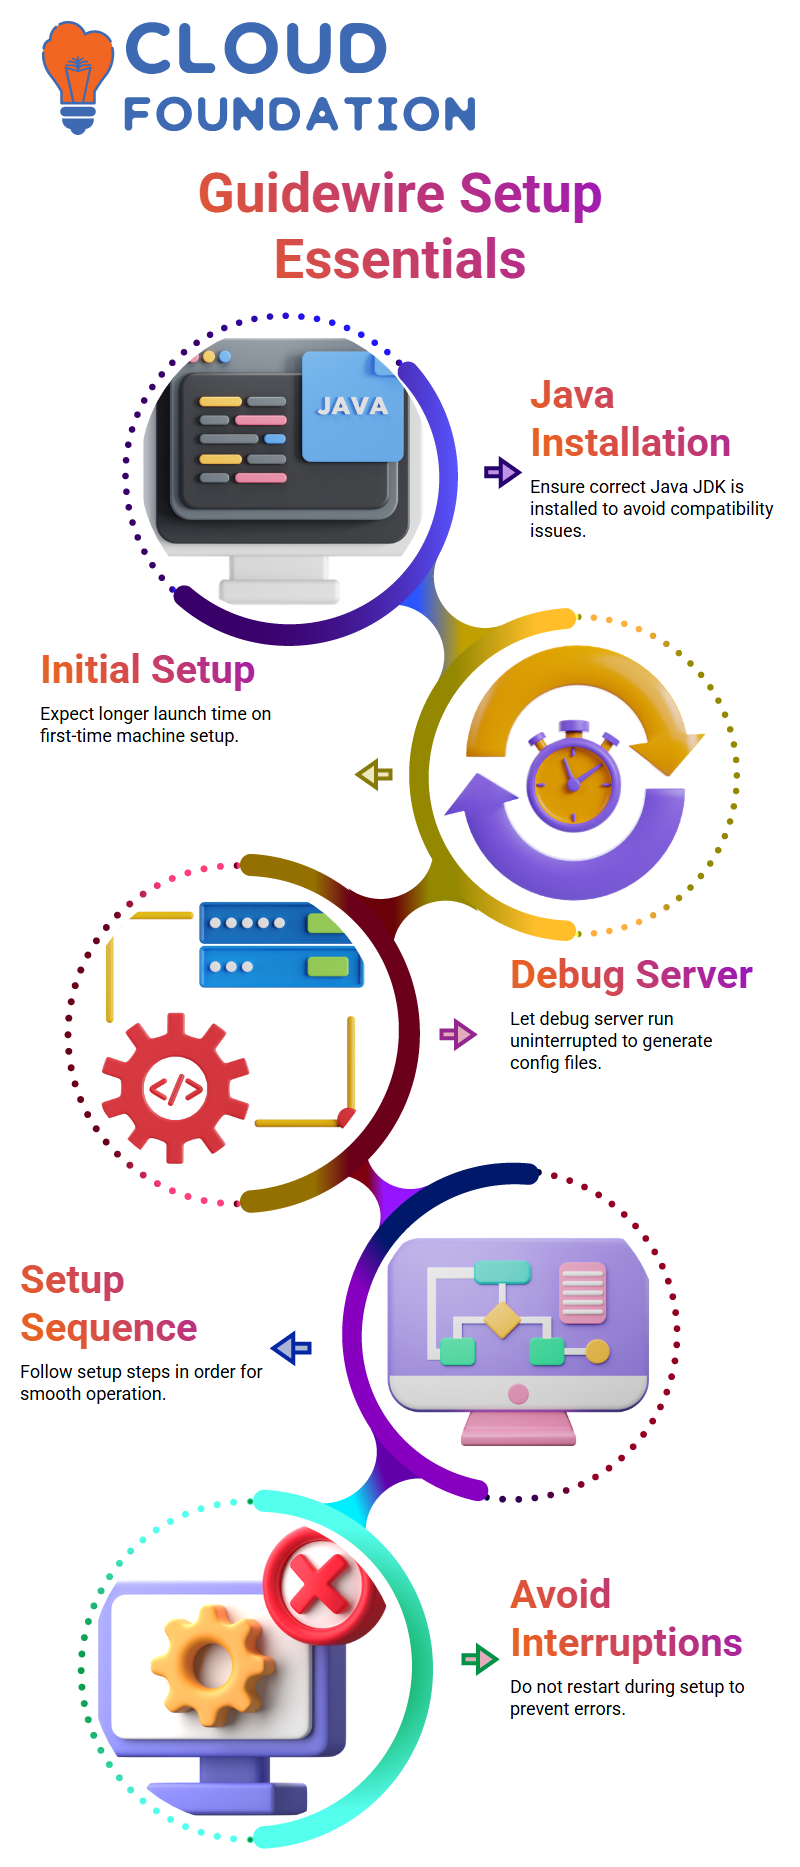
Errors may occur if you interrupt the procedure and then restart the Guidewire Policy Center.
Note that it will take longer than normal when you launch the Guidewire Policy Center on a new machine for the first time.
The Guidewire Policy Center will launch much more quickly when the setup is complete.
Guidewire Policy Center: Ongoing Setup Steps
Be careful to follow the procedures in the correct sequence as you proceed with the Guidewire Policy Center setup.
Make sure your Java JDK is installed properly, start the debug server, and then watch for the first files to appear.
Every one of these actions guarantees uninterrupted operation of the Guidewire Policy Center.
By properly configuring the Guidewire Policy Center from the beginning, a great deal of problems may be avoided later.

Guidewire Course Price

Vanitha
Author
The capacity to learn is a gift; the ability to learn is a skill; the willingness to learn is a choice