OpenSpan Installation
📣 2841 Participants |🎓 1406 Reviews | 4.6 ⭐⭐⭐⭐⭐
OpenSpan Installation:
This document describes how to install the OpenSpan Plug‐in for Microsoft Visual Studio 2010 edition. OpenSpan offers two editions of OpenSpan Studio to support the different needs of our users.
- OpenSpan Studio: OpenSpan Studio is a completely standalone version built for developers who do not have Microsoft Visual Studio 2010 installed.
As part of the OpenSpan Studio installation, the Microsoft Visual Studio 2010 installed, which provides the IDE foundation for OpenSpan Studio, feature‐rich development environment.
- OpenSpan Plug‐in for Microsoft Visual Studio 2010: The OpenSpan Plug‐in for Microsoft Visual Studio 2010 integrates with Visual Studio 2010, so you can leverage Microsoft developer tools to rapidly create OpenSpan projects from Visual Studio.
The minimum configuration required to run the OpenSpan Studio plug are,
2GB of RAM for a 64‐bit operating system and Disk Space is 2.8 GB.
- Operating system: These Windows operating systems are supported for:
- Microsoft Windows XP with Service Pack 3(32‐bit)
- Windows 7 (32‐ and64‐bit)
- Windows Server 2003 SP2 (32‐ and64‐bit)
- Windows Server 2008 SP2 (32‐ and64‐bit)
- Windows Server 2008 R2 (64‐bit)
- Browser: Microsoft Internet Explorer versions 7‐10 (32‐bit) and Internet Explorer version 11 (32‐ and 64‐bit) are recommended. OpenSpan offers limited support for these other browsers:
- Google Chrome versions 38‐47.
- Mozilla Firefox** versions 31‐39.
- Mozilla Firefox ESR** versionsfrom31.6.0‐38.3.0 (expected to work until Firefox ESR 38.8.0, which is due to reach its end of life on May 31,2016).
- Other applications: You must also have these applications:
- Microsoft Visual Studio 2010 with Service Pack1
- Microsoft .NET Framework 4.0 or4.5
- Microsoft Windows Installer 3.1 or higher
- Microsoft Windows Installer 3.1 or higher
Installing the OpenSpan Plug‐in Using the Setup Wizard:
Follow these steps to install the OpenSpan plug‐in:
Download and unzip the OpenSpan Plug‐in for Microsoft Visual Studio 2010 set up file into a temporary folder location.
- Make sure Microsoft Visual Studio is closed, and then run the installation executable file (OpenSpanPluginVS2010Setup.exe). Be sure to select Run as Administrator.
- The OpenSpan Plug‐in for Microsoft Visual Studio 2010 Setup wizard starts.
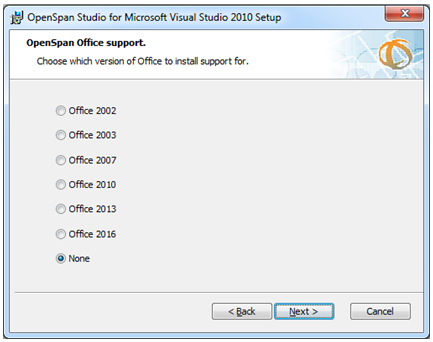
- Click Next to continue. The OpenSpan Office support panel appears.
- Select the adaptation of Microsoft Office introduced on the machine. Select none if Office isn’t introduced on this machine, the introduced variant isn’t recorded, or in the event that you don’t plan to coordinate Microsoft Office.
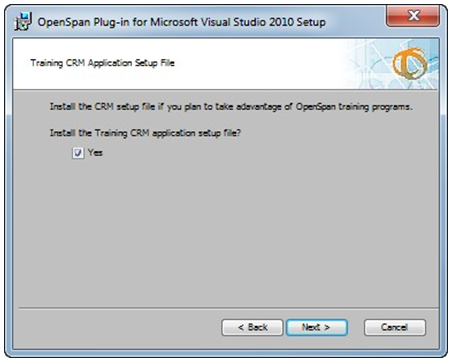
- Snap Next to proceed. The Install Training CRM Application Setup File panel appears as below.
- Click yes to introduce test CRM application setup document that is utilized with OpenSpan preparing.
- Leave this check box unchecked it’s in the event that you would prefer not to introduce test CRM application.
- The OpenSpan Services board shows as below.
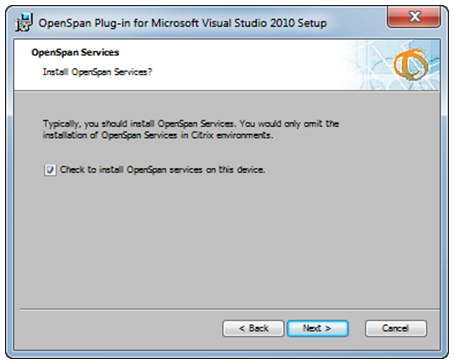
- Make sure the box is checked to install OpenSpan services, unless instructed otherwise by OpenSpan Support. Then click next.
- The Server Connectivity Configuration panel appears.
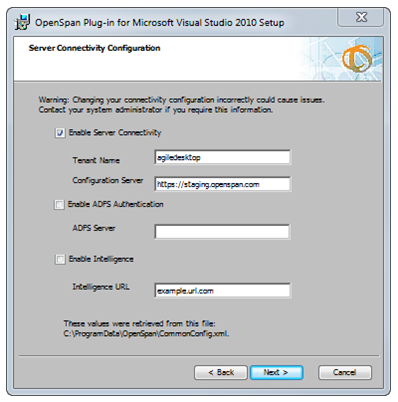
- The framework reaches esteem from the Common Config.xml record and displays them in the partner fields, you have to change any of these qualities, and then
- Click Next.
- When finished, click Next to continue. The Select Installation Folder panel appears.
Here are some elements which are used in OpenSpan server configuration, listed below:
- Enable Server Connectivity: Check this box to indicate that we want to connect to OpenSpan Management Console (OMC) and to enable the Tenant Name and Configuration fields.
- Tenant Name: The tenant name assigned to your company or organization. This is typically the company name, omitting any non‐alphanumeric characters.
- Configuration Server: The name of the configuration server. Configuration servers are used to authenticate and deliver configuration settings.
- Enable ADFS Authentication: This box enables an Active Directory Federation Services (ADFS) server. You enable an ADFS server to implement single sign‐on using the identity of the currently logged in Windows user.
- ADFS Server: The name of the ADFS server.
- Enable Intelligence: Check this box to indicate that you want to connect to the OpenSpan Workforce Intelligence™ server and to enable the Intelligence URL field.
- Intelligence URL: Enter the URL of the Workforce Intelligence server.
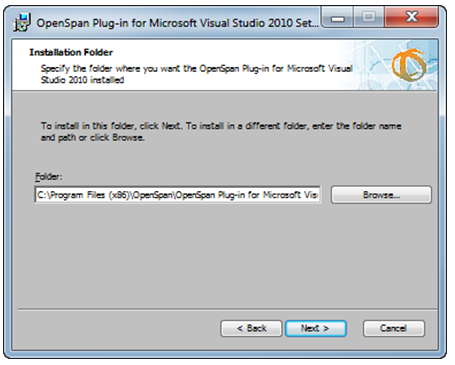
- Accept the default installation folder for the OpenSpan plug‐in or click Browse to select a different location.
- Click Next to continue. The Browser Installation panel appears.
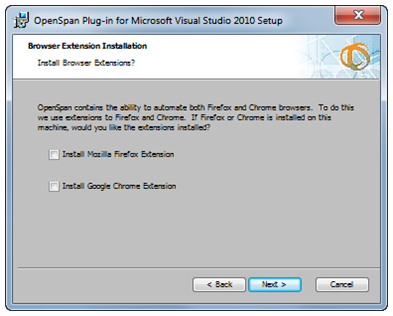
- Check the suitable browser extension cases if you have to automate other browsers in addition to Internet Explorer. OpenSpan offers limited support for the browsers shown on this panel.
- Click Next to continue. The Configure Shortcuts panel appears.
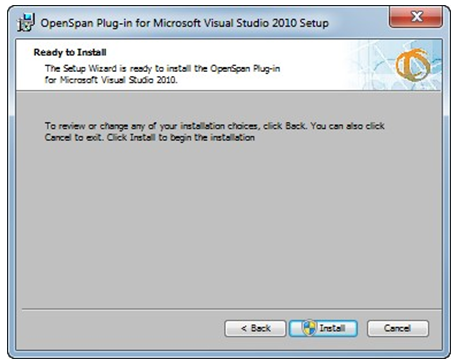
- Click Install to begin the OpenSpan plug‐in installation.
- The Installing OpenSpan Plug‐in for Microsoft Visual Studio panel shows the installation progress. When the installation finishes, the Completing the OpenSpan Plug‐in for Microsoft Visual Studio Setup panel appears.
- Click Finish to exit the Set up wizard.
Installing OpenSpan Studio via the Command Line:
You can bypass the Setup Wizard and install OpenSpan Studio via the command line using the OpenSpanStudioVS2010Setup.exe program.
This table shows the command line switches you can use:
The OpenSpan plug‐in features will be available the next time you start Visual Studio. You are now ready to start creating OpenSpan projects using Visual Studio.
| Switch Description | |
| /i | Installs the system. |
| /qn+ | Installs the system with no user interaction except for a modal dialog that appears at the end. |
| /qn | (Silent Mode). Installs the system with no user interaction at all. |
| /L*v | Tells the program to log all install information including that generated by the v (verbose) option. Include the name of the log file you want to use. |
The table below shows the command line parameters:
Here is an example:
OpenSpanPluginVS2010Setup.exe/qn+/L*vLogFileName.txtINSTALL_OFFICE=2016 AI_STARTMENU_SH=1AI_DESKTOP_SH=1
From above steps we have installed, OpenSpan software successfully, Hope it is useful to you as well.
Please follow us with more Blogs for more information.

Mahesh J
Author