What is Microsoft Azure storage and how to configure it ? – The only Azure storage tutorial you need
📣 1018 Participants |🎓 585 Reviews | 4.7 ⭐⭐⭐⭐⭐
Azure Storage
Microsoft Azure gives administrations to capacity and recovery of documents and administrations which is additionally accessible for putting away substantial volumes of information through tables and a quick solid informing administration for application designers with lines.
- Sky blue Storage accounts open two endpoints to permit record get to. The principal endpoint is for blob stockpiling.
- This permits application designers and devices that utilization the Azure Storage API to store documents specifically away.
- The second endpoint, Azure records, takes into consideration document access through the Server Message Block (SMB) convention.
- This enables you to get to documents in an Azure Storage account as you would a customary record share through a mapped drive.
Locally excess stockpiling: Copy of the information is made in a similar district where capacity account is made.
- There are 3 duplicates of each demand made against the information that lives on discrete areas.
Zone-repetitive capacity (accessible for blobs just): Copy of the information is made on independent offices either in a similar district or crosswise over two locales.
- The favorable position is that regardless of whether there is disappointment on one office, the information still can be held.
- Three duplicates of information are made. One more preferred standpoint is that information can be perused from an optional area.
Geo-repetitive capacity: `Copy is made in an alternate area which implies information is held regardless of whether there is a disappointment in the entire locale.
- The quantities of duplicates of information made are 6 for this situation.
Read-get to geo-excess stockpiling: This alternative permits perusing of information from an auxiliary area when information on the essential area isn’t accessible.
- The quantity of duplicates made is 6. The primary preferred standpoint here is that accessibility of information can be boosted.
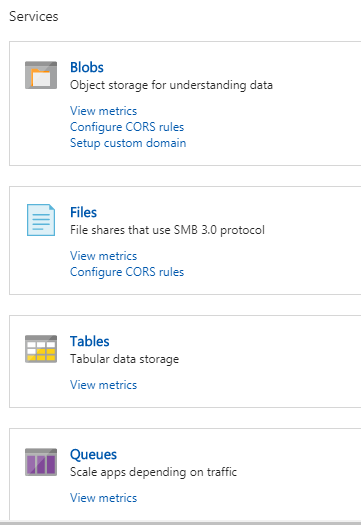
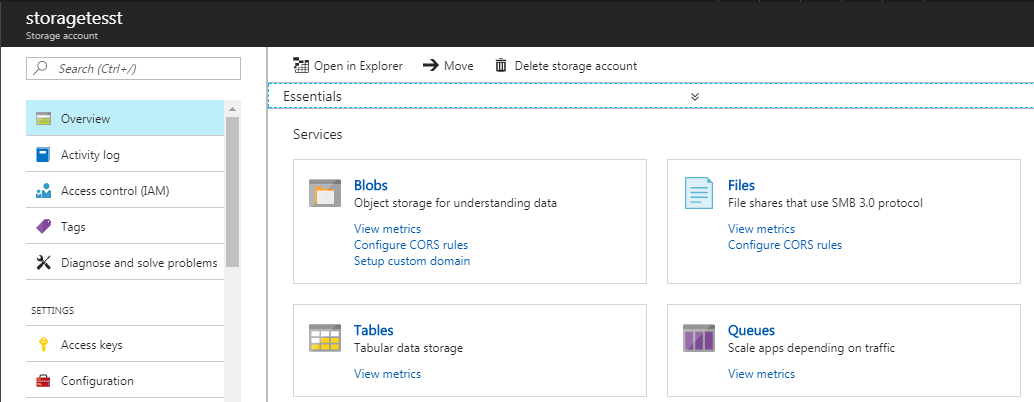
Storage services
Azure Storage helps with 4 kinds of objects that can be stored— tables, blobs, queues, and files (on a file share). Let’s have a glance at every one of these.
Creating and managing storage
To make a capacity account, sign into the Azure gateway. Snap New > Data + Storage > Storage Account.
-
- Firstly, fill the name for the capacity account. The name must be universally one of a kind since it is utilized as a major aspect of the URL.
- This will be utilized in the endpoints for blobs, records, tables, and lines.
- The next field showed is the Deployment Model. You can make a Resource Manager/Classic stockpiling account.
- Account Kind can be Blob Storage or General Purpose. Select General Purpose to use the same record for documents, tables and blobs.
- For simulation, the default is Globally Redundant Storage (GRS). Convert this to Locally Redundant Storage (LRS), which has the minimal expense.
- For test information, you needn’t bother with it to be duplicated in a totally unique area.
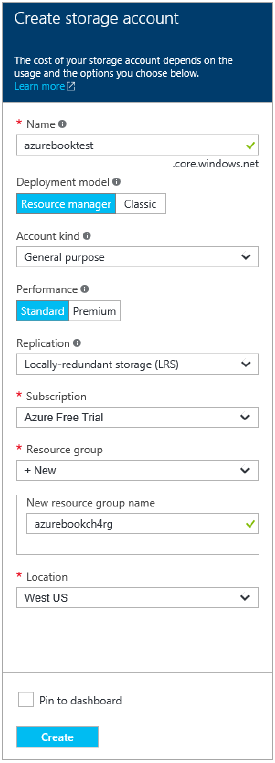
1.For Resource Group, make another one. Indicate the name of the asset gathering.
2.For Location, select the Azure locale nearest to you for the best execution.
3.Select the Pin to Dashboard check box and snap “Make”. Sky blue will arrangement the capacity record and add it to the Dashboard.
- In the event that your capacity account wasn’t naturally shown in the wake of being made, click your new capacity account from the Dashboard.
- A sharp edge will be shown with data about your capacity account
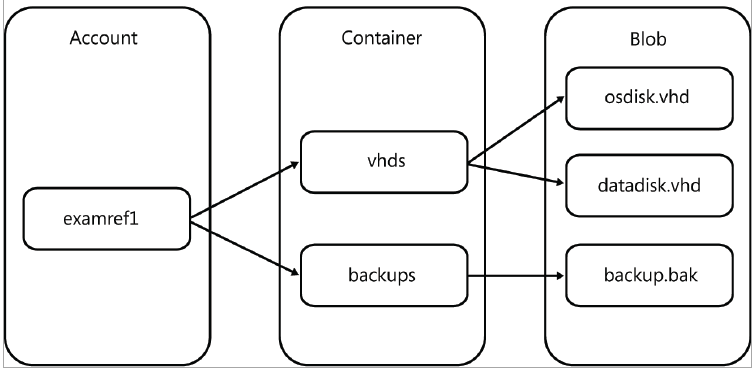
Blob storage
- The word blob is an acronym for paired huge question. Sky blue blob stockpiling is an administration for putting away unstructured information, for example, content documents, recordings, virtual hard circle records for virtual machines
- Each blob stockpiling record can have at least one holder. Compartments are comparative in idea to an envelope on your PC, in that they are utilized to aggregate blobs inside a capacity account.
- There can be a holder at the base of the capacity account, suitably named root, and there can be compartments one level down from the root compartment.
File storage
- The Azure Files benefit empowers you to set up very accessible system document shares that can be gotten to by utilizing the standard Server Message Block (SMB) convention.
- This implies various VMs can have similar records with both read and compose get to.
- The documents can likewise be gotten to utilizing the REST interface or the capacity customer libraries.
- The Files benefit evacuates the requirement for you to have your very own document partakes in an Azure VM and experience the dubious design required to make it exceedingly accessible.
- One thing that is extremely unique about Azure record shares versus document shares on-premises is that you can get to the document from anyplace by utilizing a URL that focuses to the record (like the blob stockpiling URL).
- Click Files to open the File Service cutting edge
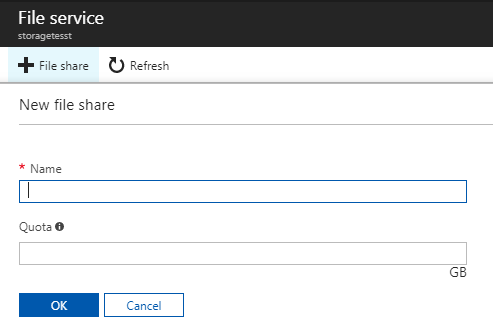
- By clicking on File Share option, you can share the files which you want. This will show the New File Share blade.
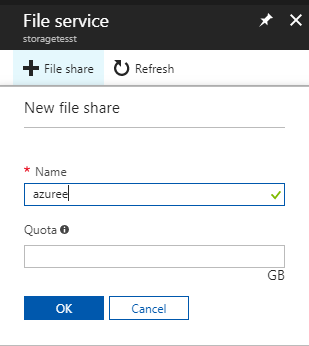
2. Give a name and size for the file share. Click on the Create icon at the bottom of the blade, and Azure will generate the file share option for you and represent it in the File Service blade.
3. Click on the new file share option to bring up the file share’s blade.

4. Now transfer a few records. Tap the Upload symbol to demonstrate the Upload Files cutting edge, Click the record envelope symbol.
- Choose File to upload exchange that showcases, peruse to any envelope and select a few records to transfer.
- You can transfer up to four documents at any given moment.
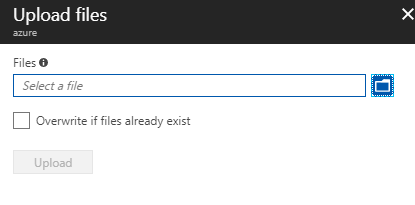
5. If you select more than four, it will ignore the extras. After selecting them and returning to the Upload Files blade, it shows the files in a list.
- Click the Start Upload button displayed to upload the files.
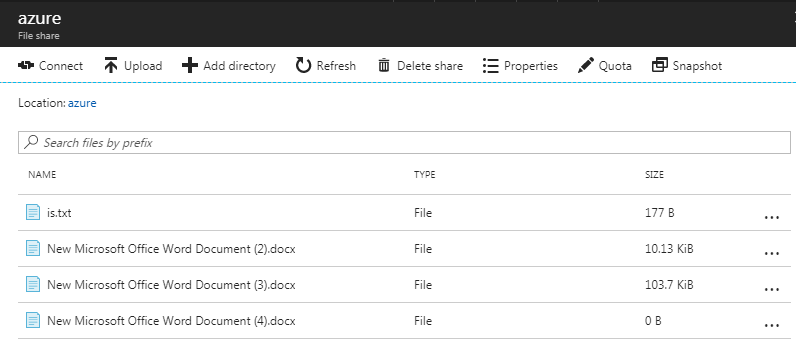
Table storage
- Purplish blue Table stockpiling is an adaptable NoSQL information store that empowers you to store vast volumes of semi-organized, no relational information.
- It doesn’t enable you to do complex joins, utilize remote keys, or execute put away systems.
- Each table has a solitary grouped list that can be utilized to inquiry the information rapidly.
- You additionally can get to the information by utilizing LINQ inquiries and Odata with the WCF Data Service .NET libraries.
- A typical utilization of table stockpiling is for diagnostics logging.
- To utilize table stockpiling, you need to make a capacity account.
- When you have a capacity account, you can make tables and fill them with information.
Line stockpiling
- The Azure Queue benefit is utilized to store and recover messages. Line messages can be up to 64 KB in size, and a line can contain a great many messages—up to the most extreme size of a capacity account.
- Lines by and large are utilized to make a rundown of messages to be handled non-concurrently.
- The Queue benefit underpins best-exertion first in, first out (FIFO) lines.
Access Keys
- This demonstrates to you your capacity account name and the two access keys.
- From the Access Keys sharp edge, you can duplicate any of the qualities to the Windows clipboard.
- You can likewise recover the capacity account get to keys here.
Make a SQL database
- An Azure SQL database is made with a characterized set of process and capacity assets.
- The database is made inside an Azure asset gathering and in an Azure SQL Database sensible server.
Pursue these means to make a SQL database.
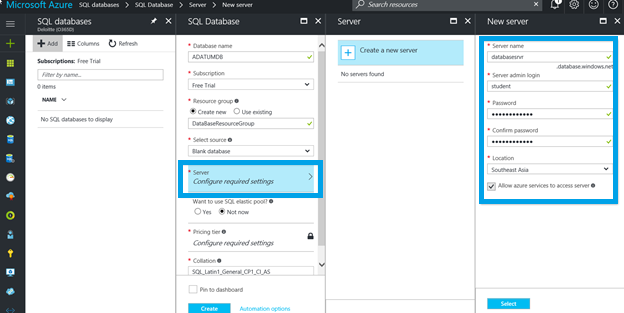
1. Select Databases from the new page and select SQL Database from the Databases page.
2. Fill out the SQL Database frame with the accompanying data:
- Database name: ADATUMDB
- Resource gathering: Database Resource Group
- Select source: Blank database
3. Click Server and after that round out the New server frame determining an all-inclusive one of a kind server name, give a name to the server administrator login, and after that indicate your preferred secret key.
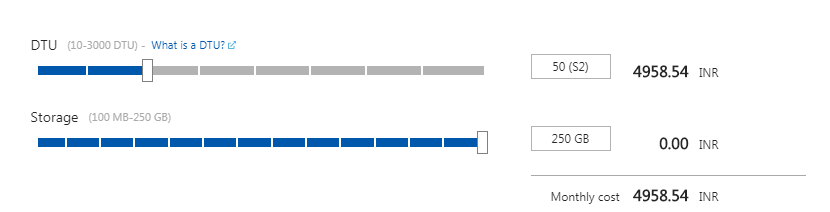
- Click Pricing level to determine the administration level and execution level for your new database.
- Utilize the slider to choose 20 DTUs and 250 GB of capacity.

Create a server-level firewall rule:
The SQL Database benefit makes a firewall at the server-level that keeps outer applications and apparatuses from associating with the server or any databases on the server except if a firewall administer is made.
To open the firewall for particular IP addresses, make a SQL Database server-level firewall control for customer’s IP address and empower outside availability through the SQL Database firewall for your IP address as it were.
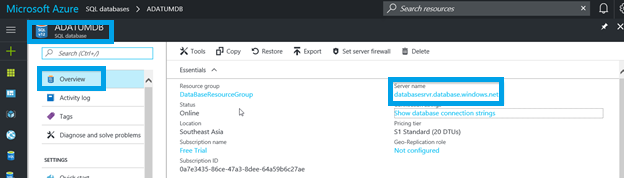
- After the organization finishes, click SQL databases from the left-hand menu and after that snap “ADATUMDB” on the SQL databases page.
- The outline page for your database opens, demonstrating to you the completely qualified server name, (for example, databasesrvr.database.windows.net) and gives alternatives to facilitate design.
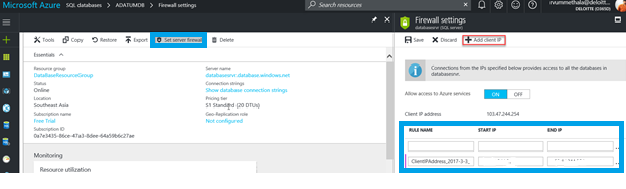
1. Click” Set server firewall” on the toolbar. The Firewall settings page for the SQL Database server opens.
2. Click “Include customer IP” on the toolbar to add your present IP deliver to another firewall run the show. A firewall run can open port 1433 for a solitary IP address or a scope of IP addresses.
3. Click” Save“. A server-level firewall control is made for your present IP address opening port 1433 on the legitimate server.
You can connect now to the SQL Database server and its databases using SQL Server Management Studio or another environment.
Query the SQL database
Since an example database in Azure is made, utilize the inherent inquiry device inside the Azure entry to affirm that you can interface with the database and question the information.
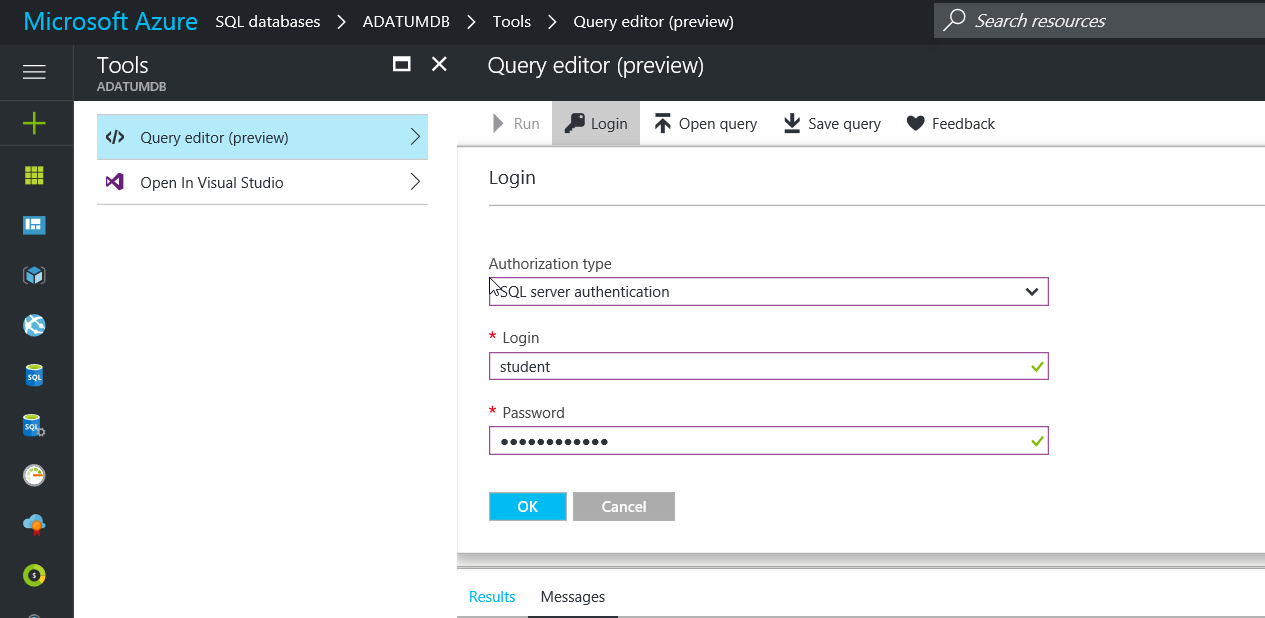
1. On the SQL Database page for your database, click Tools on the toolbar. The Tools page opens.
2.Click “Inquiry supervisor” (see), and Click on “Login” and afterward, when incited, select “SQL server confirmation” and after that give the server administrator login and secret word that you made before.
- Since you have a database, you can interface and inquiry utilizing SQL Server Management Studio.
- SQL Server Management Studio (SSMS) is an administration instrument used to make and oversee SQL Server assets from the UI or in contents.
- This fast begin shows how to utilize SSMS to interface with an Azure SQL database, and after that utilization Transact-SQL proclamations to question, embed, refresh, and erase information in the database.
- Get the association data expected to interface with the Azure SQL database. You will require the completely qualified server name, database name, and login data in the following methodology.
1. Log in to the Azure entryway.
2. Select “SQL Databases” from the left-hand menu, and tap the database made on the SQL databases page.
3. On the Overview page for your database, survey the completely qualified server name. You can drift over the server name to raise the Click to duplicate choice.
4. If you have overlooked the login data for your Azure SQL Database server, explore to the SQL Database server page to see the server administrator name and, if essential, reset the secret phrase.
Associate with your database in the SQL Database coherent server
Utilize SQL Server Management Studio to set up an association with your Azure SQL Database server.
1. Open SQL Server Management Studio.
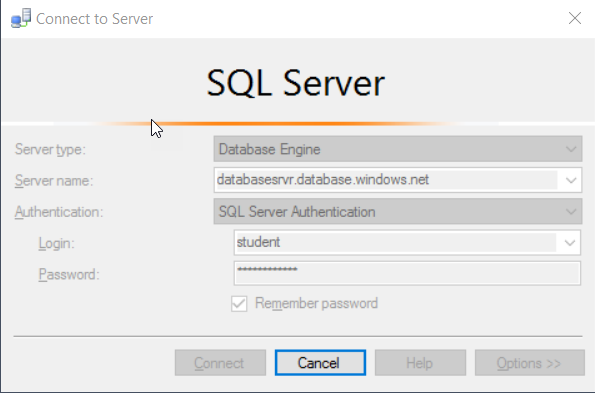
2. In the Connect to Server discourse box, enter the accompanying data:
a. Server compose: Specify Database motor
b. Server name: Enter your completely qualified server name, for example, databasesrvr.database.windows.net
c. Authentication: Specify SQL Server Authentication
d. Login: Enter your server administrator account
e. Password: Enter the secret word for your server administrator account.
1. Click Options in the Connect to server discourse box. In the Connect to database segment, enter ADATUMDB to associate with this database.
- Click Connect. The Object Explorer window opens in SSMS.
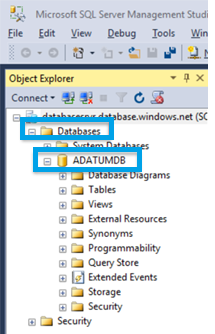
1. in Object Explorer, extend Databases and after that grow ADATUMDB to see the items in the example database.
Dynamic Directory
- Purplish blue Active Directory (Azure AD) is an exhaustive character and access administration cloud arrangement which gives you a hearty arrangement of capacities to oversee clients and gatherings.
- It anchors access to on-premises and cloud applications, including Microsoft web administrations like Office 365 and numerous non-Microsoft programming as administration (SaaS) applications.
- Incorporating Azure Active Directory with existing registries is a standout amongst the most widely recognized undertakings for an IT proficient in light of the fact that most associations have a current on-premises registry and additionally online index that the business relies upon.
- Sky blue Active Directory is in no way, shape or form expected to be a substitution for existing registries. It is an index benefit that is particularly intended for the cloud, and, specifically, the Microsoft Azure stage.
- All things considered, it conveys administrations and highlights that can enlarge existing catalog answers for handle cloud-based character and access requirements for an association.
- Arrange index synchronization with single sign-on
- Arranging a custom space
- Each Azure membership is alloted a default index and DNS name on the common space
- *.onmicrosoft.com. For instance, in the event that you agreed to accept an Azure membership utilizing the name ADATUM, the default catalog and DNS name for your Azure membership is adatum.onmicrosoft.com.
- By adding a custom space to your index, you can fundamentally enhance the client sign-on involvement for clients in the registry.
- On the off chance that you claim the adatum.com space, and partner it to your Azure registry, clients would have the capacity to sign in utilizing a sign in name, for example, [email protected].
Designing a custom space includes the accompanying advances:
1. Obtain responsibility for area in the event that you don’t as of now have one.
2. Add the space to your Azure index.
3. Update DNS records at the space recorder.
4. Verify the space in the administration entryway.
5. Change the essential space for the index.
- Accepting the responsibility for space has been set up; the subsequent stage is to add the do-fundamental to the registry.
- In the administration entryway, go to the Domains page for the catalog, and afterward click “Include”
- This activity opens an exchange box where you can determine the name of the area and demonstrate whether you intend to arrange the space for single sign-on with a nearby Windows Server Active Directory
- Clicking “Include” adds the area to the registry and produces an interesting DNS record an incentive for the space.
- The estimation of the DNS record is the thing that you should enter at your space name recorder since this record is the thing that Azure uses in the last advance to check that you claim the area.
- After the area is effectively added to the registry, the administration entrance will exhibit a second discourse box demonstrating the novel incentive for the DNS record that must be added to the space name enlistment center.
- In the wake of including either the TXT record or the MX record to your area name recorder, the following stage is to confirm the space, which is refined by clicking Verify.
- At this stage, you have two space names related with your registry: the one that was doled out to your index on the *.onmicrosoft.com shared area, and now your custom space.
- The last advance is to make your custom space the essential area for your index, which can be refined in the Domains page for the registry by clicking “Change Primary”, and you’re finished with the procedure.


Rajesh
Author
Bonjour. A curious dreamer enchanted by various languages, I write towards making technology seem fun here at Cloudfoundation.