Okta Integration Guide
Setting Up Windows Server 2019 and Okta Integration
The first step should be downloading an evaluation version of Windows Server 2019, which gives you six months of use before it expires—search online, provide your email address, and download an image file!
Once you’ve got your file, creating a bootable image is the next step. I used Rufus software, which is very handy for this—simply install it, and you’re good to go. Alternatively, if virtual machine memory usage limits don’t cooperate enough for you due to limited memory allocation for virtualisation purposes (which sometimes happens), installing your server onto a physical laptop can work too, especially if your machine lacks 16GB or 24GB for virtualisation purposes.
Installing Active Directory Before Okta Configuration
After setting up Windows Server, the next step in adding roles for Active Directory Domain Services and DNS Server should be adding them as services on your local server. It’s a straightforward process—simply click ‘Next’ during the installation wizard. Once complete, your server will reboot automatically to complete its work, and you should see them listed there as services available to use.
Now is an essential step: making the server a domain controller. Clicking ‘Add New Forest’ gives your domain its own unique name—either one you own or purchase an affordable domain online—and gives you some breathing room when working with Okta later on. Custom domains make for better collaboration overall!
Configuring the Domain Controller for Okta Integration
After configuring your domain controller, it’s time to complete its setup. Processing steps include setting your Netbios domain name and other options before hitting Install on the server. After rebooting again, you’re all set up to integrate Active Directory into Okta!
Companies already have domain controllers set up, but for practice at home, setting up a lab like this helps understand the process, which comes in handy when working with Okta to import users or configure authentication.
Exploring Okta Integration in Practice
Okta’s beauty lies in its seamless integration with Active Directory. After taking these steps, Okta allows users to explore user imports and directory synchronisation directly within its interface, which is helpful whether running tests or planning enterprise scenarios. Experiences like these make all the difference.

I strongly encourage anyone establishing their lab to explore Okta. Explore its configuration options, understand its subtle nuances, and witness its interactions with domain controllers – it may take longer, but understanding Okta’s functionality is worth your while!
Understanding Okta Integration with Active Directory
Okta integration with Active Directory. If you already use AD, adding Okta will enhance the overall setup while being seamless and straightforward. Just keep in mind that Microsoft will end support for on-premises Active Directory between 2023 and 2024, so if this discussion pertains to you, then Azure AD, their cloud version, is your better bet in two years’ time!
Although Azure AD might appear compatible, connecting Okta directly is currently impossible—only an on-premises Active Directory installation works properly with Okta for integration purposes; Azure AD serves more as the cloud version than anything else, though Group Policies, Device Management Tasks, and Intune have since replaced Intune for easier management purposes.
Why Microsoft Competes with Okta
Okta and Azure AD are competing products, so Microsoft may challenge why your organisation would require Okta when it already covers what Okta provides. But ultimately, it all boils down to meeting your organisation’s specific requirements.
Steps to Set Up Okta with Active Directory
When Okta is installed and configured, navigate directly to its directory integration settings and add Active Directory as you follow through the onscreen steps. Keep an eye out, as Okta requires connecting an Okta agent directly with a domain controller; its agent installs directly onto Windows servers.
Smaller setups may allow the Okta agent and domain controller to coexist on one machine; for larger environments, it would be wiser to designate a dedicated server solely for Okta agent installation and configuration from within your domain controller system. Once downloaded, users can configure servers directly.
Creating a Service Account for Okta Integration
Establishing Okta requires creating a service account with super administrative privileges for seamless operations even after you no longer work at your organisation. You could also consider creating an Active Directory global administrator account as another method for integration purposes.
As part of this step, Okta automatically detects your organisation’s URL; with developer tenants, it might require manual input, while this may already have been set for production environments.
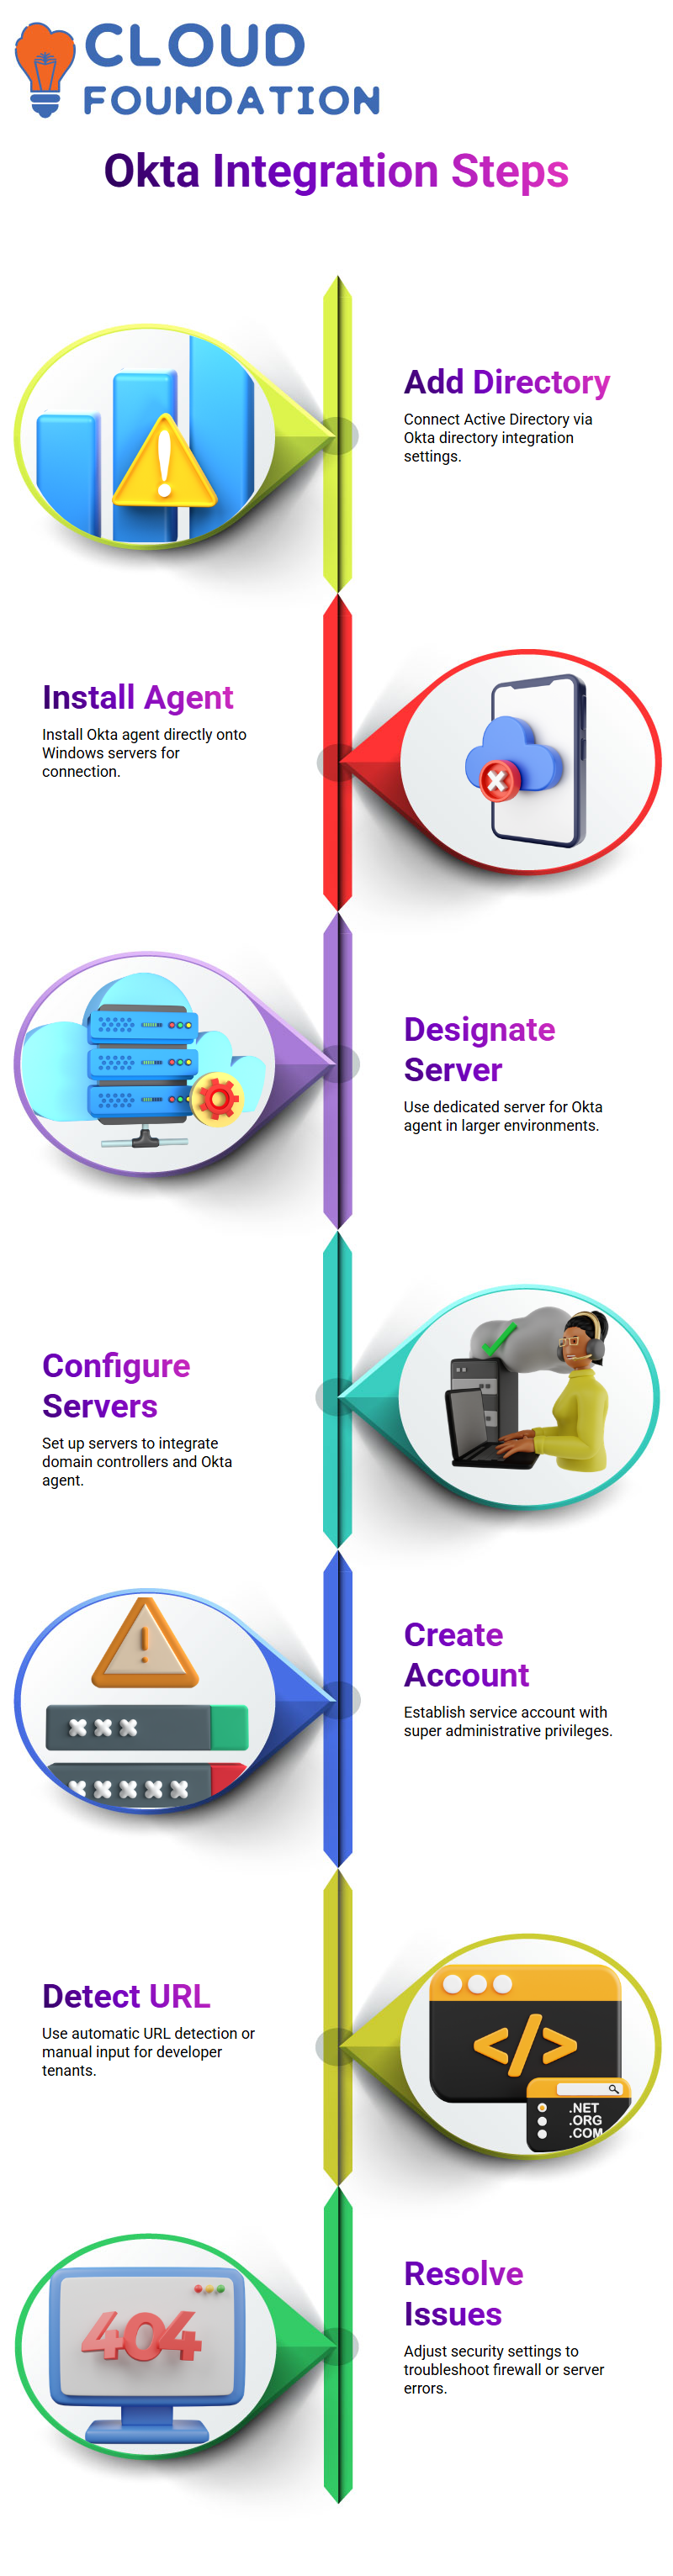
Troubleshooting Common Okta Issues
Sometimes, Okta integration may experience minor glitches due to firewall settings, server configuration errors or errors related to server settings. Should this occur for on-premise setups, security levels will need to be adjusted as appropriate; patiently follow troubleshooting steps until any hiccups have been resolved.
Setting Up Okta as Your Identity Solution
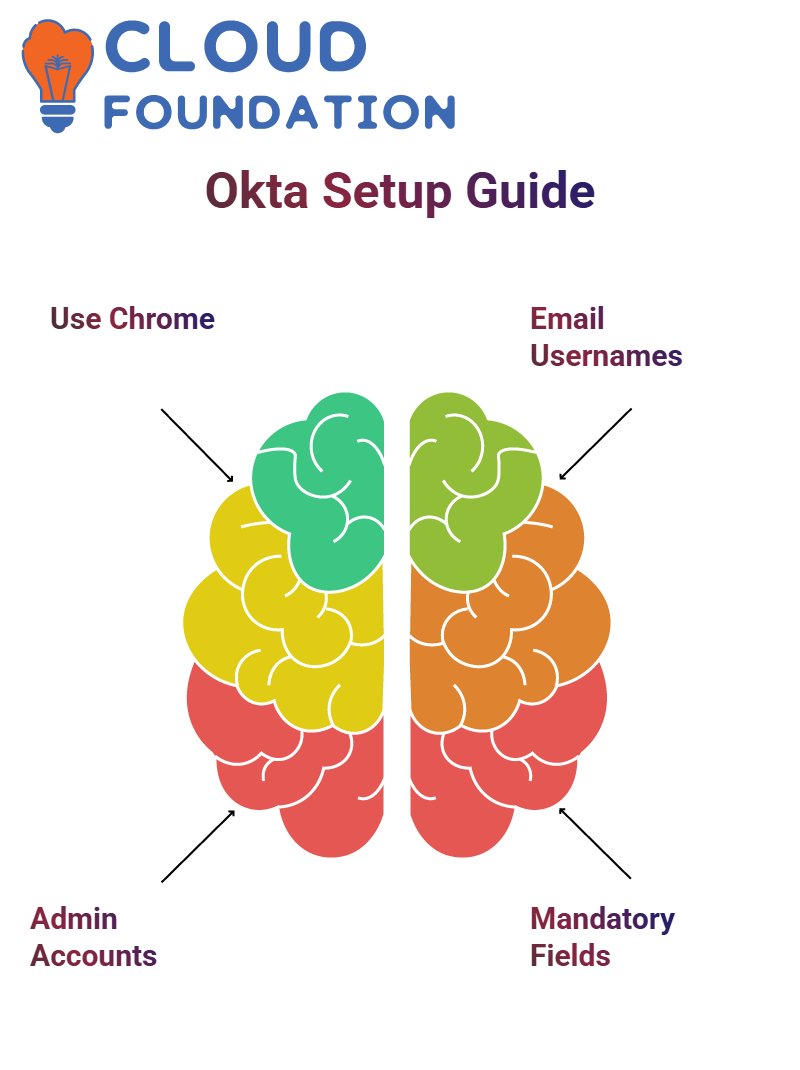
Initially, make Chrome your default browser. Sometimes, your system still uses Internet Explorer, which may require manual configuration of Okta’s configuration in addition to other systems interacting with Okta.
Using Okta Admin Accounts
Okta can only be managed in production environments using its respective administrator account or service admin account with super admin privileges to maintain security and appropriate access. When setting up an Okta account’s username format, it’s recommended that you use an email address, as this ensures maximum flexibility and the least chance for errors.
Okta requires three mandatory fields when creating users: first name, last name and email address. If your user base is large enough, select only those necessary when importing users into Okta.

Okta Training
Importing and Syncing Users with Okta
Importing users from Active Directory into Okta requires selecting all necessary attributes; some standard ones are preselected, but you can add as needed. This process will synchronise both groups and individuals.
Scheduling imports regularly is key for keeping data current; do them once every hour to maintain information accuracy. When creating users in Okta, always use an email address as their username; otherwise, an existing account won’t match, and a user won’t be made automatically unless their email is valid. Alternately, you could enable automatic confirmation/activation features based on email matches for all newcomers.
Active Directory and Okta Settings
Make sure to allow Active Directory users to sync up with Okta users. This ensures that when someone in either Okta or AD becomes deactivated, it will reflect accordingly in both systems. Do not select “do nothing;” this defeats the purpose of syncing! By default, deactivation will occur, but suspension can also be set if desired.
Reactivated users in Active Directory will also be activated within Okta for smooth integration between these services. These settings ensure seamless operation between Okta and AD/LDAP directories.
Import Safeguards in Okta
Import safeguards in Okta can be lifesavers. If more than 20% of users are removed or unassigned during an import operation, Okta will automatically pause it and notify you to prevent further imports containing unintended individuals being added into Active Directory if this number exceeds 20%; similarly if 1,000 users were imported and 200 flagged as unneeded will cause it to hold and notify of this potential risk to continue processing the import process.
This feature allows you to double-check settings and ensure behaviour matches expectations before proceeding. It is an effective way of avoiding unintended errors during user imports.
Understanding Okta Integration and Authentication
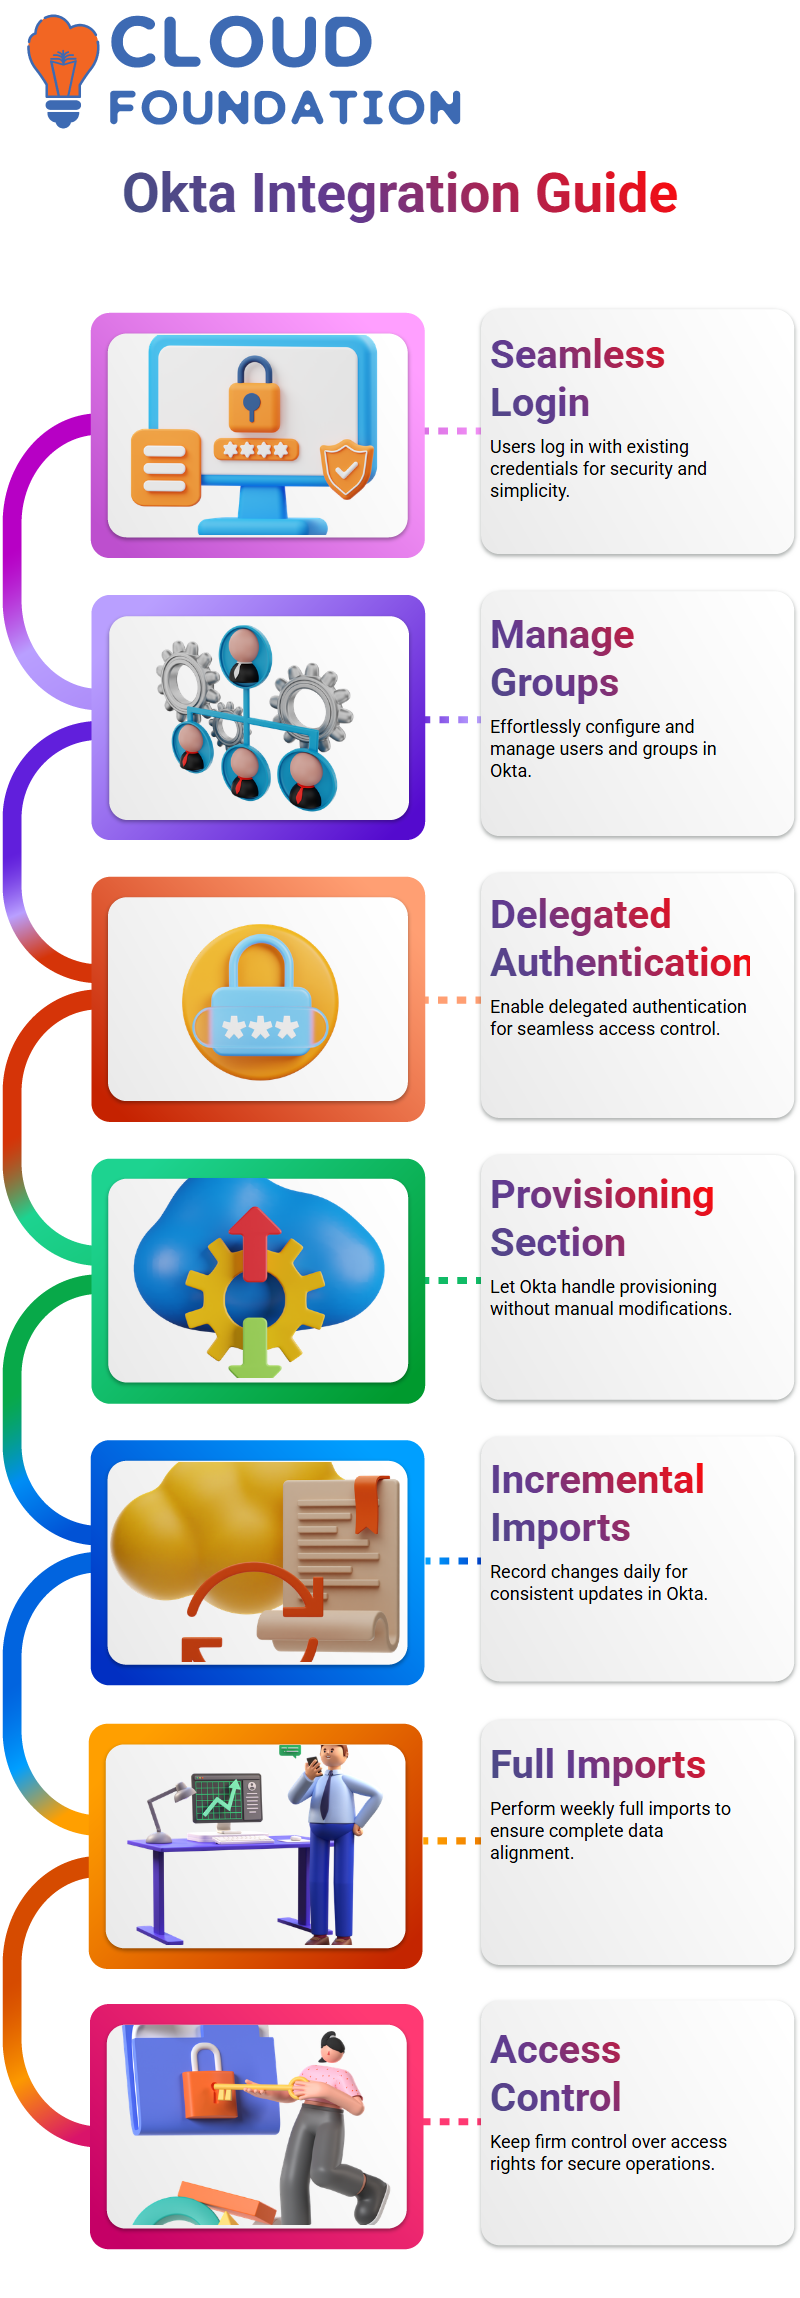
After setting it up, users can log in using existing credentials, making the process seamless and ensuring maximum security if anyone attempts to log into Okta while they’re locked out—ideal for managing users and groups without hassle! With proper configuration in place, managing users and groups becomes effortless!
Getting Started with Okta Provisioning
Provisioning in Okta is simple. Within the provisioning section, there’s an area called “to Okta,” which you don’t have to modify directly, as Okta handles everything for you. By supporting delegated authentication, Okta allows users to authenticate seamlessly while keeping firm control of access rights.
Performing Imports in Okta
Imports are an essential part of working with Okta. There are two kinds: incremental and full. Incremental imports only record changes that have taken place since your last import, while full imports reconstruct everything completely from scratch. Incremental imports should be used daily, while regular weekly full imports should ensure everything aligns perfectly in Okta.
Activating Users and Managing Groups in Okta
After you import users into Okta, they need to be activated, typically using automatic activation as best practice. In the groups section in Okta, you’ll see both Windows groups you imported and any custom groups created since, making activation easy!
Best Practices for Managing Active Directory with Okta
If you use Active Directory with Okta, remember that any modifications to imported groups must be performed directly in AD. Although Okta syncs seamlessly with AD for complete control over identity management solutions, direct work in AD is often essential if cloud-only solutions like Okta are used.
Building Labs and Exploring Okta
I advise creating a lab environment to gain hands-on experience with Okta as soon as possible. Play around with various configurations—password policies and user provisioning are just two examples—until you feel more comfortable exploring Okta fully and understanding its potential; the insights gained will prove invaluable in any future projects!
Setting up Okta for Cross-Organisation Access
How Okta can streamline user access between organisations. Take two companies like Tesla and Spacex – our goal is to ensure Tesla users can seamlessly access Spacex resources.
Okta’s beauty lies in its automation capabilities. Imagine signing a contract with an agency using Okta for both parties involved. Rather than manually creating users and assigning access rights, set up relationships through Okta, assign roles automatically based on those relationships, and get access seamlessly without hassle or headaches!
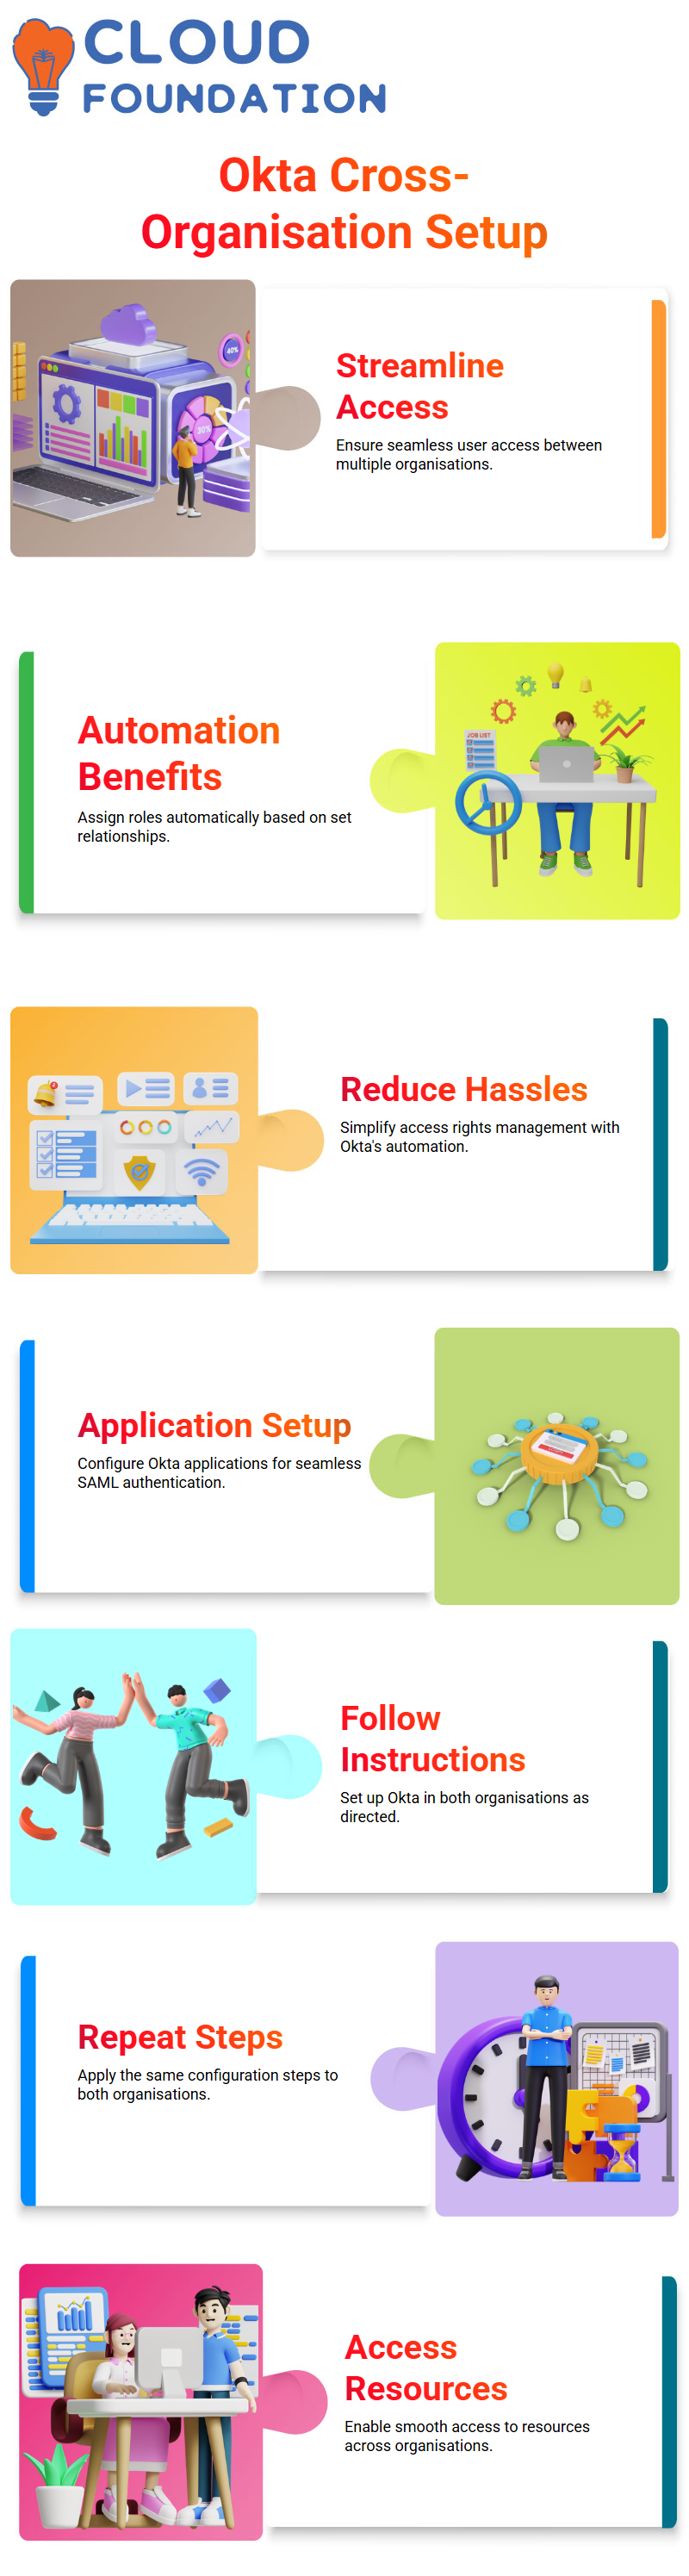
Configuring Okta Applications
After visiting Tesla as your parent organisation, open Okta’s application section in the App Catalogue and find Okta there. Set it up for Spacex using SAML authentication as directed before, and follow the instructions to set it up in Spacex itself. After the complete setup of Okta in both organisations is accomplished, repeat similar steps on both.

Okta Online Training
Setting Up Identity Providers with Okta
Add an identity provider to Spacex: Choose SAML under security and identity providers; name it Tesla, and complete this step by specifying expression subject details and settings. Note that you will also need Tesla’s IDP Issuer URL, SSO URL, and certificate details when configuring SpaceX settings.
Managing Okta Certificates
Within Spacex’s Okta settings, you will see two certificates representing various algorithms (SHA-1 and SHA-2). Make sure that the active certificate aligns with your chosen algorithm—typically, this would be SHA-2 as its default choice.
Enabling Okta Provisioning
Provisioning should then be enabled within Okta by accessing the configuration, selecting API integration, and inserting your security token. This automates user management for seamless cross-organisation access experiences.
Getting Started with Okta
Let’s venture into Okta! Envision entering a URL and setting up Okta for your workspace—simple once you know exactly what to do. Place the URL, and you’re good to go!
Learning Okta effectively can be immensely satisfying. All it requires is understanding where you come from and where your end destination should be. Everything seems to fall into place seamlessly when using Okta!
Managing Users with Okta
Okta makes user administration effortless. From adding users, updating attributes, or deactivating accounts to decommissioning accounts altogether, Okta guarantees seamless transitions every time.
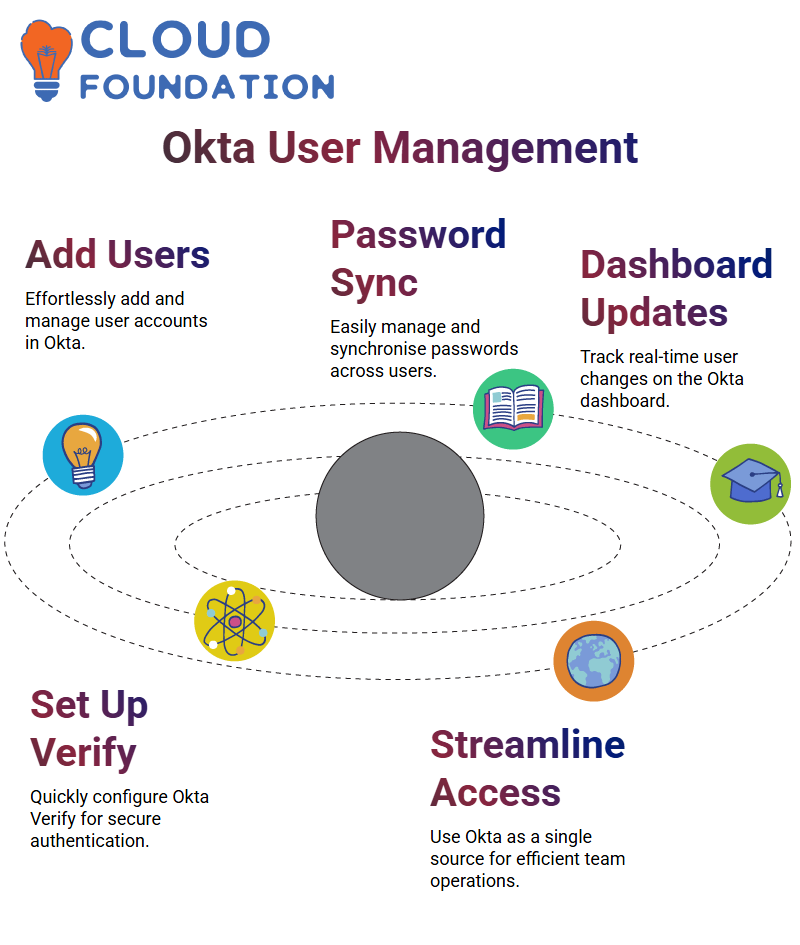
Okta makes everything straightforward, from managing password synchronisation and pushing new users to being a single source for all available options, helping your team run efficiently.
Exploring the Okta Dashboard
Okta’s end-user dashboard is truly revolutionary: when assigning users, their changes appear instantly on screen, and refreshing allows users to confirm in real time any adjustments to user statuses that might have taken place since assigning.
The dashboard also helps guide you through setting up Okta Verify quickly and effortlessly; within moments, you are set up to securely authenticate with Okta.
Okta’s Seamless Integrations
Integrating Okta into your workflow streamlines processes significantly. When users are deactivated in Okta, Okta automatically automates deactivations across systems, offering maximum efficiency at its finest! Okta’s ability to seamlessly handle these tasks ensures your focus remains where it matters: on work.
Preparing for the Okta Certified Professional Configuration Exam
Let’s first focus on their focus areas, such as managing profiles, provisioning self-service accounts and integration networks, MFA policies, branding logs, and support processes. I know these topics well myself, so I am confident they’re achievable by all.
Exams also feature practical elements. In particular, candidates will have to create and configure an admin role and update user settings; create groups; assign members to those groups and set group rules; and master Okta’s org-to-org integration capabilities, network zones, multifactor settings, sign-on policies, profile attributes, and onboarding abilities to prepare. It all boils down to applying Okta knowledge effectively in real-life scenarios.
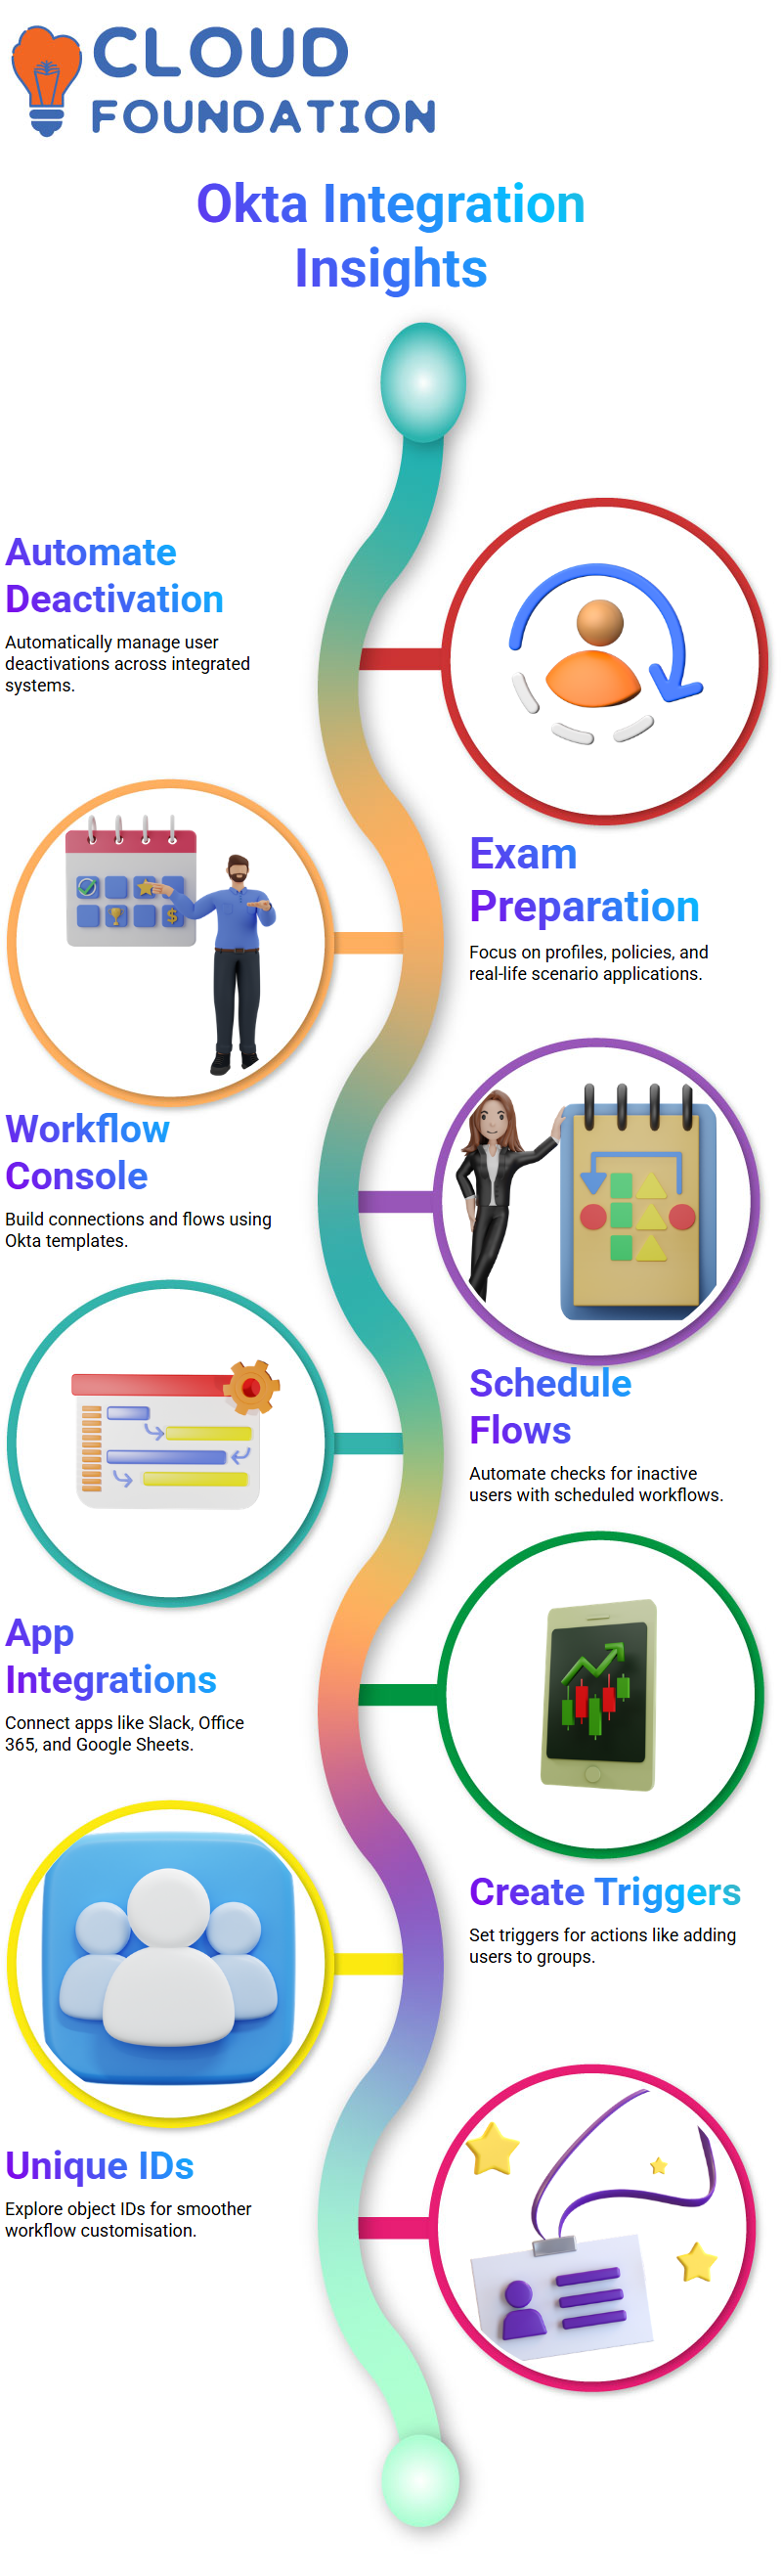
Understanding Okta Workflows and Console
Okta’s workflow console is one of my favourite features. Here, users can build connections and flows using pre-built templates provided by Okta to identify active Okta users more seamlessly and to configure apps, an essential task to ensure smooth operations. Once you set up the client ID and secret, Okta workflows become powerfully efficient tools!
Okta’s workflow console gives incredible flexibility. I can schedule flows that check for inactive users every Sunday and Thursday at 2 a.m. By setting this flow up, Okta searches for users marked as active, processes their data, logs when they last signed in, and records any possible absences into customised tables if applicable.
Exploring Okta’s Connections and Integrations
Okta supports numerous app integrations such as Slack, Google Sheets and Office 365 integrations and creates your API endpoints if required. My setup included creating triggers like user sign-ins to automate actions such as adding users to groups – something Okta makes intuitive and customisable!
As you use Okta workflows, remember that every object has a unique ID number you can easily discover by visiting its page. Okta’s connectors make your workflow smoother and more efficient, whether adding users to groups or integrating apps like Jira. I have enjoyed exploring all its pre-built connectors and custom integration possibilities!
Learning Okta Workflows Step by Step
When I started exploring Okta, I became fascinated with its dynamic IDS for users and groups. If you are just getting started in workflows with Okta, the first step should be identifying your user ID. I navigated directly to that section, picked out their sign-in ID, and saved it away for further use—this step helped me fully grasp how Okta dynamically uses IDS!
Once an ID has been saved, turning specific workflows on and off is straightforward in Okta. I sometimes temporarily allow configurations to show how they function before disabling them again later. I log out, log back in, and access my admin console to watch how workflows execute in real time with data flowing around dynamically pulled IDS from Okta for execution.
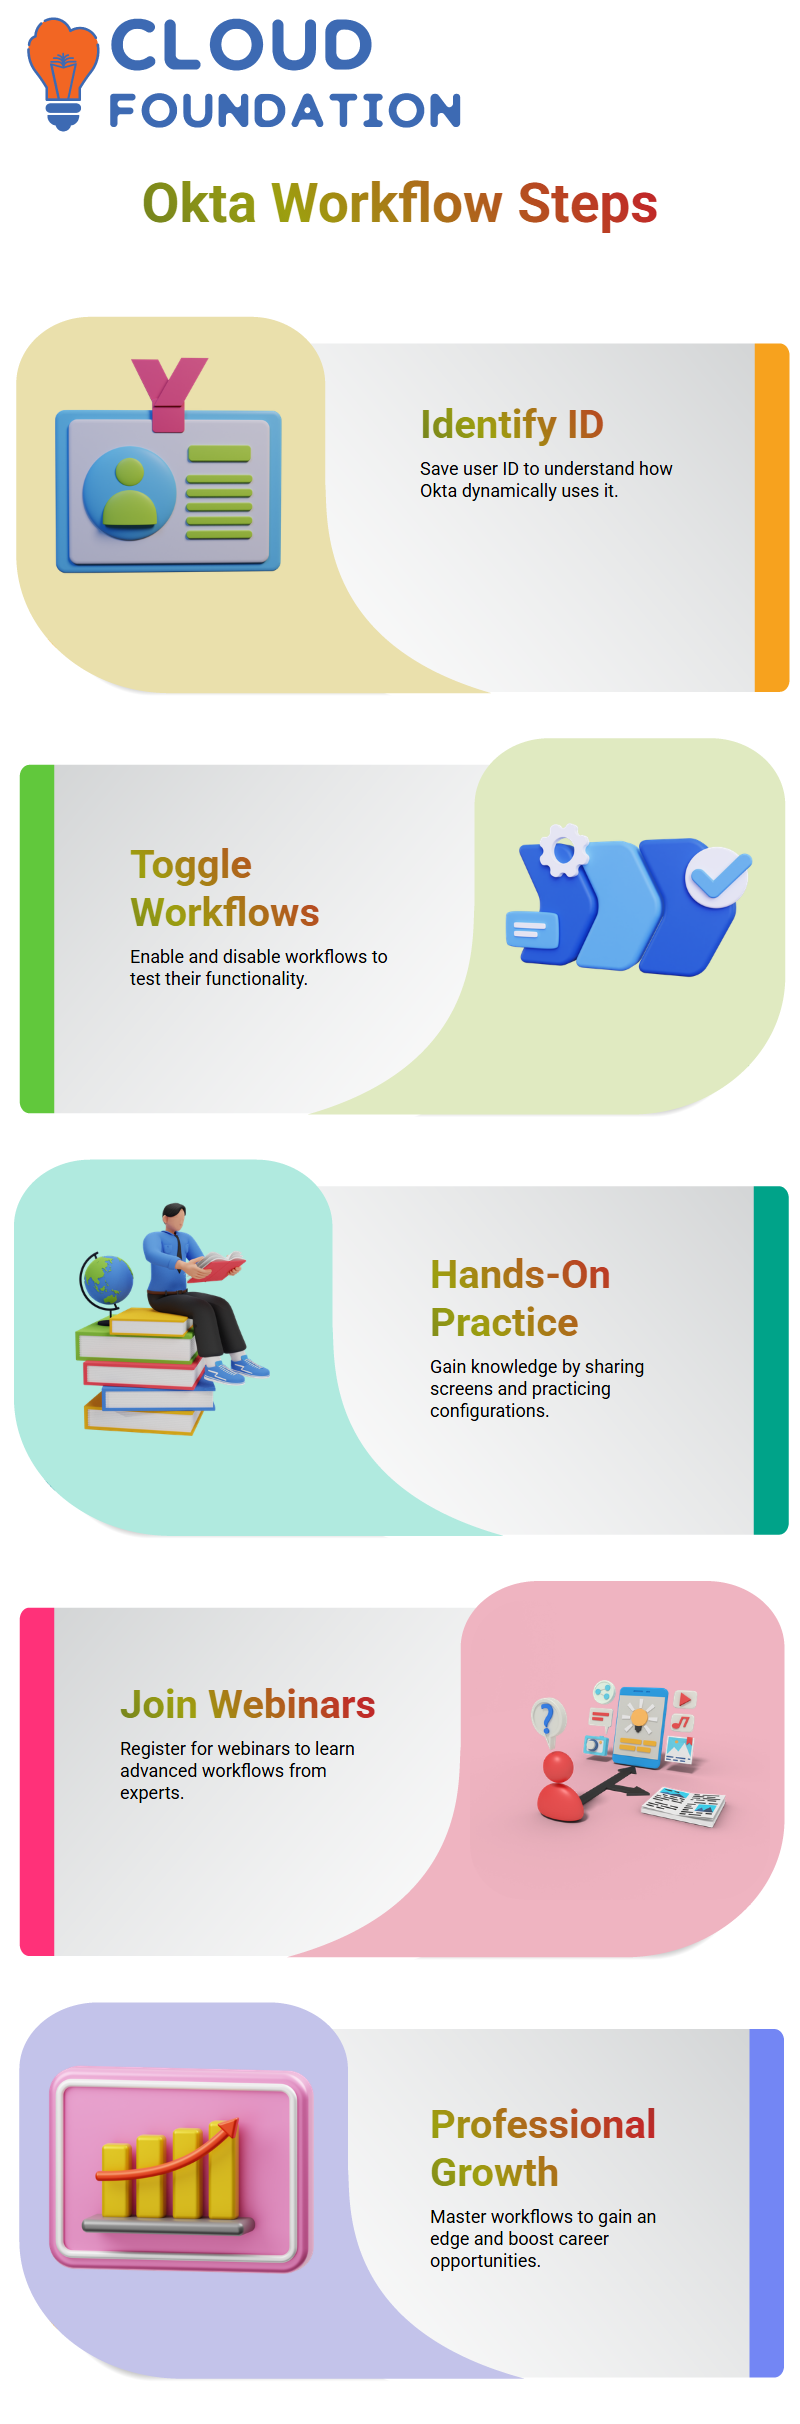
Integrations, creating groups, and managing users in Okta are relatively straightforward tasks for anyone to manage, but mastery of advanced workflows sets you apart. In just six months, learning and mastering Okta workflows could lead to unparalleled professional growth that opens doors to greater opportunities.
Bookmark resources related to Okta workflows and register for any upcoming webinars that feature them. These webinars may even offer free admission, so as a participant, you may even gain insight from experts!
One of the best ways to gain an in-depth knowledge of Okta is through hands-on practice. By sharing your screen and walking through configuration steps together with an experienced mentor, hands-on practice builds confidence while simultaneously preparing you for certification exams. Okta also provides free practice exams; email registration may be required to access them. Likewise, webinars provide a great platform to develop advanced workflows as you work toward certification exams.
Professional Growth Through Okta
Okta workflows are more than technical skills – they represent an investment in your professional journey. By dedicating the time necessary to master Okta, you gain an edge many others might overlook; advanced workflows may not be widely known, giving you an unrivalled edge within your field.
While Okta offers plenty of resources and expert help, self-learning must remain its core focus. Bookmark useful links, join webinars regularly, and participate in hands-on sessions regularly—these resources can propel your understanding of Okta workflows forward exponentially!
Webinars and certification exams are key milestones on your Okta learning journey. They offer a structured way of measuring knowledge and confidence with workflows. From troubleshooting issues to developing hands-on configurations, Okta provides plenty of growth opportunities.

Okta Course Price

Navya Chandrika
Author